Retrieval augmented generation (RAG) (opens new window) was a major leap forward in AI, transforming how chatbots (opens new window) engage with users. By combining retrieval-based methods with generative AI, RAG allowed chatbots to pull real-time data from large external sources and generate responses that were both accurate and relevant. This innovation made the development of chatbots simpler and more efficient while ensuring they can adapt to changing data, which is crucial in areas like customer support (opens new window), where timely and precise information is key.
However, traditional RAG systems struggled with making quick decisions in fast-paced scenarios, such as booking appointments or handling real-time requests. This is where the agentic RAG (opens new window) comes into play, it tackles this by adding intelligent agent (opens new window)s that can retrieve, verify, and act on data autonomously. Unlike standard RAG, which mainly retrieves data and generates responses, agentic RAG enables AI to proactively make decisions on the fly, making it perfect for complex situations like medical diagnoses or customer service, where quick and accurate decision-making is essential.

This is exactly what we will implement in this tutorial, an intelligent, agentic question-answering (Q&A) system that dynamically decides whether to use a knowledge base (opens new window) or perform an internet search based on the user’s query. To achieve this, we need to integrate several tools:
- LangChain (opens new window): This will manage how the system interacts with the language model and the other tools. Based on the query, it will help the system decide whether to search the knowledge base or the Internet.
- MyScaleDB (opens new window): MyScaleDB will serve as our vector database, storing embeddings (opens new window) that represent the knowledge base. It will be used to efficiently search through stored data when the query is related to the knowledge base.
- VoyageAI (opens new window): It provided different embedding models to generate embeddings from text, which are used to encode knowledge for better search and matching.
- Tavily (opens new window): This will fetch real-time information from the internet when the user’s question requires up-to-date or external data, ensuring the system always provides accurate answers.
# Setting up the Environment
First, you need to install the necessary libraries and get the packages we need to develop this AI application by running the following command:
pip install -U langchain-google-genai langchain-voyageai langchain-core langchain-community
The next step is to set up the API keys required to use Gemini (opens new window) (Google Generative AI) and Tavily search (opens new window). For MyScale, you can follow this quickstart (opens new window) guide.
import os

# MyScale API credentials
os.environ["MYSCALE_HOST"] = "msc-24862074.us-east-1.aws.myscale.com"
os.environ["MYSCALE_PORT"] = "443"
os.environ["MYSCALE_USERNAME"] = "your_myscale_username"
os.environ["MYSCALE_PASSWORD"] = "your_myscale_password"

# Tavily API key
os.environ["TAVILY_API_KEY"] = "your_tavily_api_key"

# Google API key for Gemini
os.environ["GOOGLE_API_KEY"] = "your_google_api_key"
Replace the placeholders in the above code with your actual API keys.
Note: All of these tools provide free versions to test out the functionalities. So, feel free to create an account on the respective platforms and get the API key.
# Reading and Splitting the Text
The next step is to prepare the data for the knowledge base. For this tutorial, we use a dataset that contains primary information about MyScaleDB. The data is split into manageable chunks, making it easier for the system to process and retrieve relevant information efficiently.
from langchain_text_splitters import CharacterTextSplitter

with open("myscaledb_summary.txt") as f:
    state_of_the_union = f.read()

text_splitter = CharacterTextSplitter(
    separator="\\n\\n",
    chunk_size=1000,
    chunk_overlap=200,
    length_function=len,
    is_separator_regex=False,
)

texts = text_splitter.create_documents([state_of_the_union])
The CharacterTextSplitter splits the text into smaller, manageable chunks based on character count.
Note: A txt file about MyScale is used for this blog. You can use data any of your choice.
# Adding Data to the Knowledge Base
After chunking the data, let’s get the embeddings and save those embeddings into a knowledge base. We use VoyageAIEmbeddings to generate embeddings for the text chunks and store them in MyScaleDB.
from langchain_voyageai import VoyageAIEmbeddings
from langchain_community.vectorstores import MyScale

embeddings = VoyageAIEmbeddings(
    voyage_api_key="your_voyageai_api_key",
    model="voyage-law-2"
)

vectorstore = MyScale.from_documents(
    texts,
    embeddings,
)

retriever = vectorstore.as_retriever()
The .from_documents (opens new window)method typically takes a list of documents and a model to transform those documents into vector embeddings. This method automatically saves those embeddings to the knowledge base.
# Creating Tools for the Model
In LangChain, tools (opens new window) are functionalities that the agent can utilize to perform specific tasks beyond text generation. By equipping the model with tools, it is enabled to interact with external data sources, fetch real-time information, and provide more accurate and relevant answers to user queries.
In this application, we develop two different tools for the agent to decide which tool to use based on the user's query:
- If the query is related to MyScaleDB or MyScale, the agent will use the retriever tool to fetch information from our custom knowledge base.
- For other queries that require the latest information, the agent will use the Tavily search tool to perform live internet searches.
# Retriever Tool for MyScale Content
Let’s use the MyScaleDB retriever created above and use create_retriever_tool method to convert that retriever into a tool.
from langchain.tools.retriever import create_retriever_tool

retriever_tool = create_retriever_tool(
    retriever,
    "retrieve_myscale_content",
    "Use to return information about MyScaleDB.",
)
# Tavily Search Tool for Live Internet Data
LangChain provides built-in support to use the Tavily search tool (opens new window) through its community package.
from langchain_community.tools import TavilySearchResults

tool = TavilySearchResults(
    max_results=5,
    search_depth="advanced",
    include_answer=True,
    name="live_search",
    description="Use to search the latest news from the internet.",
)

tools = [retriever_tool, tool]
The TavilySearchResults tool is set up to find the latest news with a maximum of 5 results and advanced search depth, including direct answers. In the end, both tools are added to a list.
Note: The descriptions of each tool are really important because they help the agent figure out which tool to use and for what purpose.
# Define the Workflow of the Application
Now that the required tools have been defined, the next step is to lay out the complete workflow of the agentic RAG application, including the steps involved and the checks it'll perform.
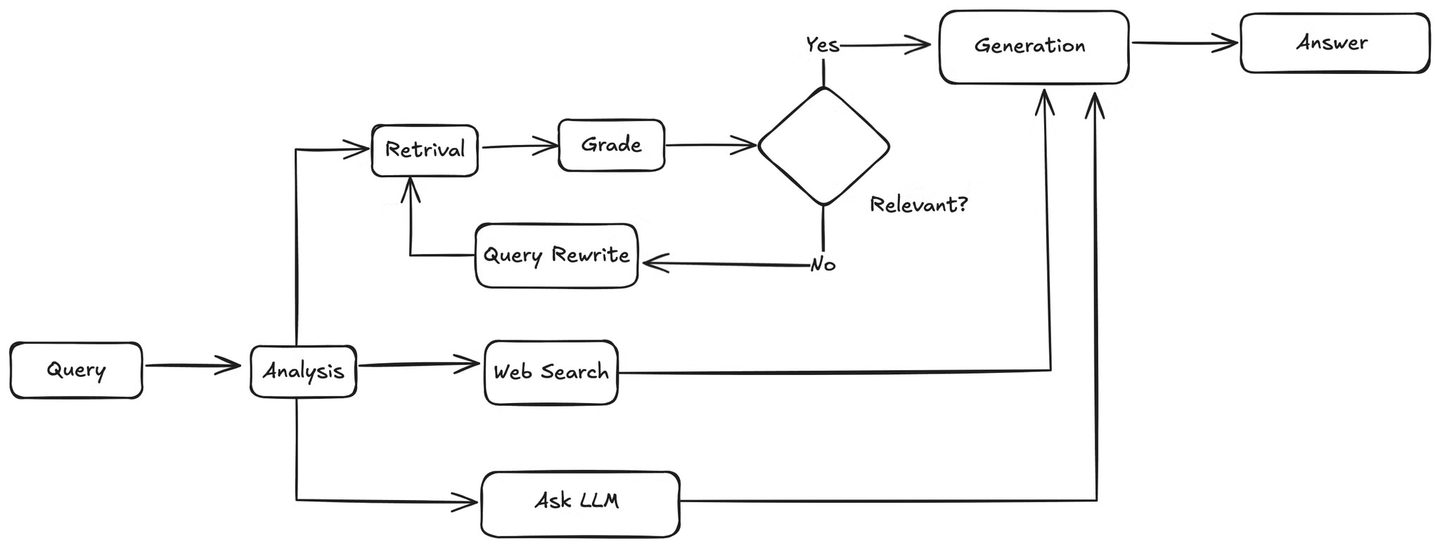
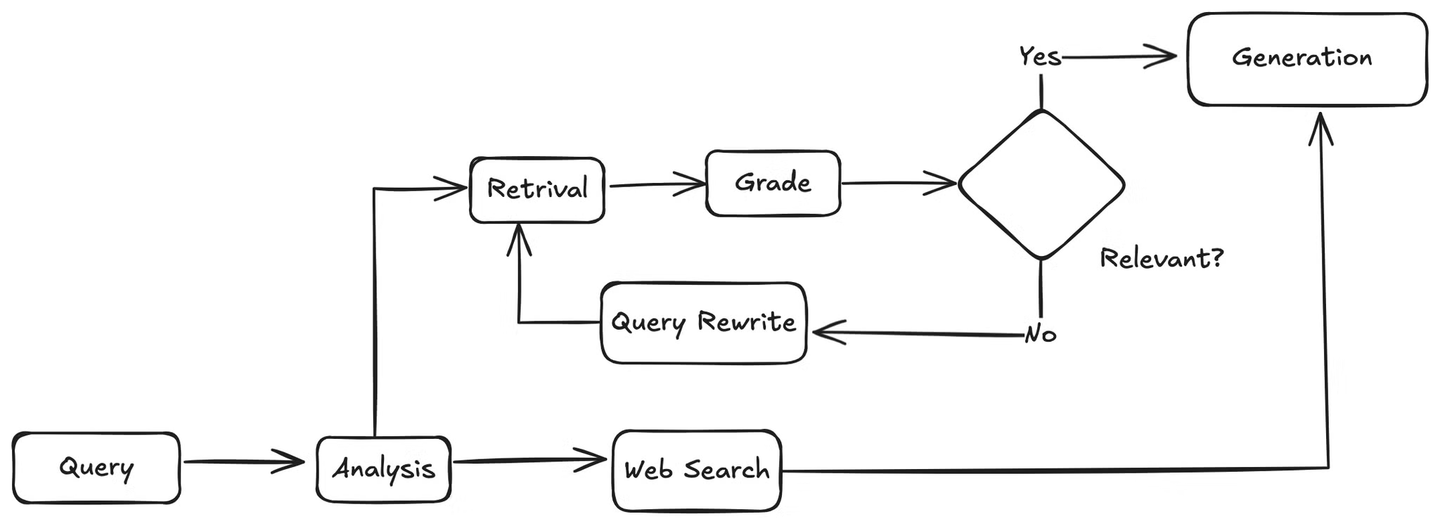
First, when a user query comes in, the agent will analyze it to understand the intent and context. Then, it will decide whether to use the knowledge base or perform a web search. If a web search is needed, it will utilize the web search tool to gather results and then pass the results to the LLM, which will generate an answer to the user's query based on the retrieved information.

If the query is related to the knowledge base, the agent will retrieve relevant chunks from the knowledge base and pass them to a function that matches these documents against the user's query to check for relevance. If the documents are relevant, the agent will send them to the LLM for answer generation. If they are not relevant, it will invoke a method to rewrite the user's query. The rewritten query is then sent back to the retriever, and the process repeats until relevant information is found.
# Define the Agent and State
The first step is to define an AgentState class which will be used to track the state of the response throughout the whole process.
# Standard Library Imports
from typing import Literal, Annotated, Sequence, TypedDict

# Langchain Core Imports
from langchain_core.messages import BaseMessage, HumanMessage
from langchain_core.output_parsers import StrOutputParser
from langchain_core.prompts import PromptTemplate
from langchain_core.pydantic_v1 import BaseModel, Field

# Langchain and External Tools
from langchain import hub
from langchain_google_genai import ChatGoogleGenerativeAI

# LangGraph Imports
from langgraph.graph.message import add_messages

class AgentState(TypedDict):
    messages: Annotated[Sequence[BaseMessage], add_messages]
Now, let’s define the agent that will analyze the user's query and decide whether to use the knowledge base or perform a web search. The Gemini model is used to select the right tool and generate a response based on the query.
def agent(state):
    messages = state["messages"]
    model = ChatGoogleGenerativeAI(
        model="gemini-1.5-pro",
        temperature=0,
        max_tokens=None,
        timeout=None,
        max_retries=2,
    )
    model = model.bind_tools(tools)
    response = model.invoke(messages)
    return {"messages": [response]}
# Grading Retrieved Documents
The agent ensures that the documents retrieved are relevant to the user's query. The grade_documents function will analyze the retrieved documents to check their relevance. If the retrieved documents are relevant, the agent will decide to generate an answer; if not, it will rewrite the user's query.
def grade_documents(state) -> Literal["generate", "rewrite"]:
    # Data model for grading
    class Grade(BaseModel):
        """Binary score for relevance check."""
        binary_score: str = Field(description="Relevance score 'yes' or 'no'")

    # LLM
    model = ChatGoogleGenerativeAI(
        model="gemini-1.5-pro",
        temperature=0,
        max_tokens=None,
        timeout=None,
        max_retries=2,
    )

    llm_with_tool = model.with_structured_output(Grade)

    # Prompt
    prompt = PromptTemplate(
        template="""You are a grader assessing relevance of a retrieved document to a user question.
        Here is the retrieved document:

        {context}

        Here is the user question: {question}
        If the document contains keyword(s) or semantic meaning related to the user question, grade it as relevant.
        Give a binary score 'yes' or 'no' to indicate whether the document is relevant to the question.""",
        input_variables=["context", "question"],
    )

    # Chain
    chain = prompt | llm_with_tool

    messages = state["messages"]
    last_message = messages[-1]

    question = messages[0].content
    docs = last_message.content

    scored_result = chain.invoke({"question": question, "context": docs})

    score = scored_result.binary_score

    if score == "yes":
        return "generate"
    else:
        return "rewrite"
# Rewriting User Queries
If the retrieved documents are not relevant, the agent will rewrite the user's query to improve the retrieved results from the knowledge base.
def rewrite(state):
    messages = state["messages"]
    question = messages[0].content

    msg = [
        HumanMessage(
            content=f"""
        Look at the input and try to reason about the underlying semantic intent / meaning.
        Here is the initial question:

        -------
        {question}
        -------
        Formulate an improved question:""",
        )
    ]

    # LLM
    model = ChatGoogleGenerativeAI(
        model="gemini-1.5-pro",
        temperature=0,
        max_tokens=None,
        timeout=None,
        max_retries=2,
    )
    response = model.invoke(msg)
    return {"messages": [response]}
# Generating the Final Response
Once it’s confirmed that the retrieved documents are relevant, the agent will send the retrieved documents for the final response generation.
def generate(state):
    messages = state["messages"]
    question = messages[0].content
    last_message = messages[-1]

    docs = last_message.content

    # Prompt
    prompt = hub.pull("rlm/rag-prompt")

    # LLM
    llm = ChatGoogleGenerativeAI(
        model="gemini-1.5-pro",
        temperature=0,
        max_tokens=None,
        timeout=None,
        max_retries=2,
    )

    # Chain
    rag_chain = prompt | llm | StrOutputParser()

    # Run
    response = rag_chain.invoke({"context": docs, "question": question})
    return {"messages": [response]}
# Put Everything in the LangGraph
We use LangGraph (opens new window) to streamline the workflow of the application. It helps to manage the different steps the agent will take, like deciding whether to use the knowledge base or web search, retrieving relevant information, and generating responses. By organizing these tasks into nodes and defining clear paths between them, LangGraph ensures that everything runs smoothly and efficiently. It simplifies handling complex decisions and keeps the app structured and easy to maintain.

To make a graph, let’s specify the nodes (actions) and how they connect.
from langgraph.graph import END, StateGraph, START
from langgraph.prebuilt import ToolNode

# Define a new graph
workflow = StateGraph(AgentState)

# Define the nodes we will cycle between
workflow.add_node("agent", agent)  # Agent node
retrieve = ToolNode([retriever_tool])
workflow.add_node("retrieve", retrieve)  # Retrieval node
search = ToolNode([tool])
workflow.add_node("search", search)  # Search node
workflow.add_node("rewrite", rewrite)  # Rewrite node
workflow.add_node("generate", generate)  # Generate node
The add_node function adds nodes to the graph. The first argument is the name of the node, and the second is the function it represents.
# Defining the Edges
Edges define the transitions between nodes based on certain conditions. Edges control the complete flow of the application.
# Defining the Conditional Edge for Tools
First, define a condition that determines whether to use the retriever or the search tool based on the user's query. If the query mentions "myscaledb" or "myscale", the agent will use the retriever; otherwise, it'll use the search tool.
def tools_condition(state) -> Literal["retrieve", "search"]:
    messages = state["messages"]
    question = messages[0].content.lower()

    if "myscaledb" in question or "myscale" in question:
        return "retrieve"
    else:
        return "search"
# Adding the Edges
Now, add the edges to the workflow graph.
workflow.add_edge(START, "agent")
workflow.add_conditional_edges(
    "agent",
    tools_condition,
    {
        "search": "search",
        "retrieve": "retrieve",
    },
)

workflow.add_conditional_edges(
    "retrieve",
    grade_documents,
)

workflow.add_edge("retrieve", "generate")
workflow.add_edge("search", "generate")
workflow.add_edge("generate", END)
workflow.add_edge("rewrite", "agent")

# Compile the graph
graph = workflow.compile()
The add_edge function defines a direct transition from one node to another. The add_conditional_edges function allows us to specify transitions based on conditions. The first argument is the source node, the second is the condition function, and the third is a dictionary mapping possible condition outcomes to target nodes.
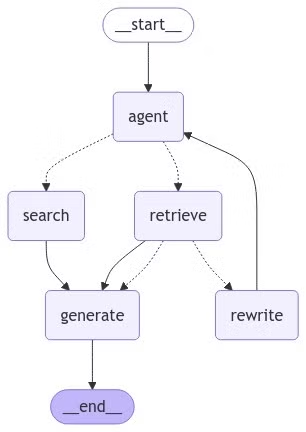
# Visualizing the Final Graph
Let's visualize the final graph to see how the nodes and edges are connected.
from IPython.display import Image, display

try:
    display(Image(graph.get_graph(xray=True).draw_mermaid_png()))
except Exception:
    # This requires some extra dependencies and is optional
    pass

# Executing the Graph
Finally, execute the graph to see our Q&A system in action.
inputs = {
    "messages": [
        ("user", "Which model was released by OpenAI recently?"),
    ]
}
for output in graph.stream(inputs):
    for value in output.items():
        print(value["messages"][0], indent=2, width=80, depth=None)
It’ll generate an output like this:
OpenAI recently released a new generative AI model called OpenAI o1. '
 'This model excels in "reasoning" abilities, allowing it to fact-check itself '
 'and tackle complex problems like coding and math. It was released on '
 'September 12, 2024, and is available for ChatGPT Plus and Team users.
When the query about MyScaleDB is made like this:
inputs = {
    "messages": [
        ("user", "What is MyScaleDB?"),
    ]
}
for output in graph.stream(inputs):
    for key, value in output.items():
        print(value["messages"][0], indent=2, width=80, depth=None)
The output would be something like this :
"MyScaleDB is a high-performance, cloud-based database built on top of the
open-source ClickHouse, designed specifically for AI and machine learning
applications. It supports both structured and unstructured data, making
it ideal for managing vast volumes of data and performing complex analytical
tasks."
# Conclusion
By completing this tutorial, you've successfully built a dynamic Q&A system that intelligently chooses between using a knowledge base or performing live internet searches based on user queries. Integrating tools like LangChain, MyScaleDB, VoyageAI, and Tavily, you've created an adaptable AI agent capable of efficiently handling complex questions. Keep exploring these tools to further enhance your AI applications!


