In the world of machine learning, there used to be a limit on models—they could only handle one type of data at a time. However, the ultimate aspiration of machine learning is to rival the cognitive prowess of the human mind, which effortlessly comprehends various data modalities simultaneously. Recent breakthroughs, exemplified by models like GPT-4V, have now demonstrated the remarkable ability to concurrently handle multiple data modalities. This opens up exciting possibilities for developers to craft AI applications capable of seamlessly managing diverse types of data, which is known as multi-modal applications.
One compelling use case that has gained immense popularity is multi-modal image search. It lets users find similar images by analyzing features or visual content. Thanks to the rapid advancements in computer vision and deep learning, image search has become incredibly powerful.
In this article, we're going to build a multi-modal image search application using a model from the Hugging Face library. Before diving into the practical implementation, let's go over some basics to set the stage for our exploration.
# What is a Multi-Modal System
A multi-modal system refers to any system that can use more than one mode of interaction or communication. It means a system that can process and understand different kinds of inputs at the same time, such as text, images, voice, and sometimes even touch or gestures, and can also return results in various ways.
For example, GPT-4V (opens new window), developed by OpenAI, is an advanced multimodal model that can handle multiple “modalities” of the text and image inputs at the same time. When provided with an image accompanied by a descriptive query, the model can analyze the visual content based on the provided text.
# What are Multi-Modal Embeddings
Multi-modal embedding, an advanced machine-learning technique, is the process of generating a numerical representation of multiple modalities, such as images, text, and audio in a vector format. Unlike basic embedding techniques, which represents only one single data type in a vector space, multi-modal embedding can represent various data types within a unified vector space. This allows, for example, the correlation of a text description with a corresponding image. With the help of multi-modal embeddings, a system could analyze an image and relate it to relevant textual descriptions, or vice versa.
Now, let's discuss how to develop this project and the technologies we will use.
# Tools and Technologies
We will use CLIP (opens new window), MyScale (opens new window), and Unsplash-25k Dataset (opens new window) in this project. Let's look at them in detail.
- CLIP: You'll use a pre-trained multi-modal CLIP (opens new window) developed by OpenAI from Hugging Face. This model will be used to integrate text and images.
- MyScale: MyScale is a SQL vector database that is used to store and process both structured and unstructured data in an optimized way. You will use MyScale to store the vector embeddings and query the relevant images.
- Unsplash-25k dataset: The dataset provided by Unsplash contains about 25 thousand images. It includes some complicated scenes and objects.
# How to Set up Hugging Face and MyScale
To start using Hugging Face and MyScale in the local environment, you need to install some Python packages. Open your terminal and enter the following pip command:
pip install datasets clickhouse-connect requests transformers torch tqdm
Once the installation is finished, you can verify by entering the below command in your terminal.
pip freeze | egrep '(datasets|clickhouse-connect|requests|transformers|torch|tqdm)'
It will print the newly installed dependencies with versions.
# Download and Load the Dataset
The first step is to download the dataset and extract it locally. You can do that by entering the following commands in your terminal.
# Download the dataset
wget https://unsplash-datasets.s3.amazonaws.com/lite/latest/unsplash-research-dataset-lite-latest.zip

# unzip the downloaded files into a temporary directory
unzip unsplash-research-dataset-lite-latest.zip -d tmp
Let's load the required data into Python data frames from the extracted files.
# Import pandas
import pandas as pd
# Load the photos file from the directory
df_photos = pd.read_csv("tmp/photos.tsv", sep='\t', header=0)
df_photos
We are loading the photos file from the directory, which contains information about the photos in the dataset. A photo profile looks like this:
| photo_id | photo_url | photo_image_url |
|---|---|---|
| xapxF7PcOzU | https://unsplash.com/photos/wud-eV6Vpwo | https://images.unsplash.com/photo-143924685475... |
| psIMdj26lgw | https://unsplash.com/photos/psIMdj26lgw | https://images.unsplash.com/photo-144077331099... |
The difference between photo_url and photo_image_url is that the photo_url contains the URL to the description page of an image, telling the author and other meta information of the photo. The photo_image_url contains the URL to the image only and we will use it to download the image.
# Load the Model and Get the Embeddings
After loading the dataset, let's first load the clip-vit-base-patch32 (opens new window) model and write a Python function to transform images into vector embeddings. This function will use the CLIP model to represent the embeddings.
# Import pytorch
import torch
# Import transformers to load the model and processor from Hugging Face
from transformers import CLIPProcessor, CLIPModel

# Load the CLIP model from Hugging Face
model = CLIPModel.from_pretrained('openai/clip-vit-base-patch32')
# Load the processor used to pre-process the images and make them compatible with the model
processor = CLIPProcessor.from_pretrained("openai/clip-vit-base-patch32")

# Define the method
def create_embeddings(image=None, text=None):
    # Initialize embeddings
    image_embeddings = None
    text_embeddings = None

    # Process the image if provided
    if image is not None:
        image_embeddings = extract_image_features(image)
        image_embeddings = torch.tensor(image_embeddings)
        image_embeddings = image_embeddings / image_embeddings.norm(dim=-1, keepdim=True)

    # Process the text if provided
    if text is not None:
        text_inputs = processor(text=[text], return_tensors="pt", padding=True)
        with torch.no_grad():
            text_outputs = model.get_text_features(**text_inputs)
            text_embeddings = text_outputs / text_outputs.norm(dim=-1, keepdim=True)
            text_embeddings = text_embeddings.squeeze(0).tolist()

    # Combine the embeddings if both image and text are provided, and normalize
    if image_embeddings is not None and text_embeddings is not None:
        combined_embeddings = (image_embeddings + torch.tensor(text_embeddings)) / 2
        combined_embeddings = combined_embeddings / combined_embeddings.norm(dim=-1, keepdim=True)
        return combined_embeddings.tolist()

    # Return only image or text embeddings if one of them is provided
    return image_embeddings.tolist() if text_embeddings is None else text_embeddings
The code above is designed to process both text and image inputs, either separately or simultaneously, and return the corresponding embeddings. Let’s see how they work:
- If you provide both an image and text, the code returns a single vector, combining the embeddings of both.
- If you provide either text or image (but not both), the code simply returns the embeddings of the provided text or image.
Note:
We are using a basic way to merge two embeddings just to focus on the multi-modal concept. But there are some better ways to merge embeddings like concatenation and attention mechanisms.
We'll load, download, and pass the first 1000 images from the dataset to the above create_embeddings function. The returned embeddings will then be stored to a new column photo_embed.
# Import the Image moduke for image processing
from PIL import Image
# Import the requests module for making HTTP requests
import requests
# Import tqdm for processing bar visualization
from tqdm.auto import tqdm

# Get the first 1000 images
photo_ids = df_photos['photo_id'][:1000]
# Filter the DataFrame to get the required columns
df_photos = df_photos.loc[photo_ids.index, ['photo_id', 'photo_image_url']]
# Create a session to make HTTP requests
session = requests.Session()

# Define the Python function to download and get embeddings
def process_image(url):
    try:
        # Make a GET request to download the image
        response = session.get(url, stream=True)
        response.raise_for_status()
        image = Image.open(response.raw)
        # Get the embeddings and return
        return create_embeddings(image)
    except requests.RequestException:
        return None
# construct a URL to download the image with a smaller size
df_photos['photo_image_url'] = df_photos['photo_image_url'].apply(lambda x: x + "?q=75&fm=jpg&w=200&fit=max")
# Pass the images one by one to the 'process_image' and save the embeddings to the newly created column 'photo_embed'
df_photos['photo_embed'] = [process_image(url) for url in tqdm(df_photos['photo_image_url'], total=len(df_photos))]

# Remove rows where image processing failed
df_photos.dropna(subset=['photo_embed'], inplace=True)
# Reset the index and rename the 'id' column to 'index'
df_photos = df_photos[df_photos['photo_id'].isin(photo_ids)].reset_index().rename(columns={'index': 'id'})

# Close the session
session.close()
Note:
This process takes some time and it also depends on your internet speed.
After this process, our dataset is completed. The next step is to create a new table and store the data in MyScale.
# Connect with MyScale
To connect the application with MyScale, you'll need to complete a few steps for setup and configuration.
- Account Creation: Start by creating an account on MyScale (opens new window).
- Cluster Creation: Next, you need to create a cluster. For that, you can refer to the “Create Cluster (opens new window)" documentation provided by MyScale with detailed instructions.
- Obtaining Connection Details: Once your cluster is set up, the next step is to Get the connection details (opens new window) for establishing a connection between your application and the MyScale cluster.
Once, you have the connection details, you can replace the values in the code below:
import clickhouse_connect

client = clickhouse_connect.get_client(
    host='your-host-addres',
    port=443,
    username='your-username',
    password='your-password'
)
# Create a Table
Once the connection is established, the next step is to create a table. Now, let's first take a look at our data frame with this command:
df_photos
The data frame looks like:
| photo_id | photo_image_url | photo_embed |
|---|---|---|
| wud-eV6Vpwo | https://images.unsplash.com/uploads/1411949294... | [0.0028754104860126972, 0.02760922536253929, 0... |
| psIMdj26lgw | https://images.unsplash.com/photo-141633941111... | [0.019032524898648262, -0.04198262840509415, 0... |
| 2EDjes2hlZo | https://images.unsplash.com/photo-142014251503... | [-0.015412664040923119, 0.01923416182398796, 0... |
Let's create a table depending on the data frame.
# Check if a table with the same name exists or not. If exists, drop that table
client.command("DROP TABLE IF EXISTS default.myscale_photos")
# create a table for photos
client.command("""
CREATE TABLE default.myscale_photos
(
    id UInt64,
    photo_id String,
    photo_image_url String,
    photo_embed Array(Float32),
    CONSTRAINT vector_len CHECK length(photo_embed) = 512
)
ORDER BY id
""")
The above commands will create a table in your MyScale cluster.
# Insert the Data
Let's insert the data into the newly created table:
# upload data from datasets
client.insert("default.myscale_photos", df_photos.to_records(index=False).tolist(),
              column_names=df_photos.columns.tolist())

# check count of inserted data
print(f"photos count: {client.command('SELECT count(*) FROM default.myscale_photos')}")

# create vector index with cosine
client.command("""
ALTER TABLE default.myscale_photos
ADD VECTOR INDEX photo_embed_index photo_embed
TYPE MSTG
('metric_type=Cosine')
""")

# check the status of the vector index, make sure vector index is ready with 'Built' status
get_index_status="SELECT status FROM system.vector_indices WHERE name='photo_embed_index'"
print(f"index build status: {client.command(get_index_status)}")
The code above will insert the data into the table and create an index using the MSTG algorithm. Indexes are created for fast retrieval of data from the table. The last command is used to make sure that the index has been created successfully or not. If yes, you'll see "index build status: Built".
Note:
The MSTG algorithm has been created by MyScale and it's way faster than other indexing algorithms like IVF and HNSW.

# How to Query MyScale
Once the data has been inserted. We are ready to utilize MyScale to query data and use the multimodal to get images. So, Let's first try to get a random image from the table.
import requests
import matplotlib.pyplot as plt
from PIL import Image
from io import BytesIO

# download image with its url
def download(url):
    response = requests.get(url)
    return Image.open(BytesIO(response.content))
def show_image(url, title=None):
    img = download(url)
    fig = plt.figure(figsize=(4, 4))
    plt.imshow(img)
    plt.show()
random_image = client.query("SELECT * FROM default.myscale_photos ORDER BY rand() LIMIT 1")
target_image_url = random_image.first_item["photo_image_url"]
print("Loading target image...")
show_image(target_image_url)
The above code should randomly search an image from the table and display it on your code editor.
# How to Get Relevant Images Using Text and Image
As you have learned, a multi-modal model can process multiple data modalities at the same time. Similarly, our model can simultaneously process both images and text, providing relevant images. We will provide the following image along with the text: 'A man standing on the beach.'
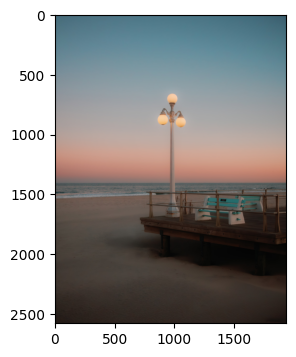
Let's pass the image URL with the text to the create_embeddings function.
image_url="https://images.unsplash.com/photo-1701443478334-c1a4bfda91ff?q=80&w=1936&auto=format&fit=crop&ixlib=rb-4.0.3&ixid=M3wxMjA3fDB8MHxwaG90by1wYWdlfHx8fGVufDB8fHx8fA%3D%3D"
query_text="A man standing on the beach"
embeddings=create_embeddings(download(url),query_text)
The next step is to write a query to get top_k relevant results from the dataset.
top_k = 5
# Query to get the relevant results from the database
results = client.query(f"""
SELECT photo_id, photo_image_url, distance(photo_embed, {embeddings}) as dist
FROM default.myscale_photos
ORDER BY dist ASC
LIMIT {top_k}
""")

# Download the relevant images
images_url = []
for r in results.named_results():
    # construct a URL to download an image with a smaller size by modifying the image URL
    url = r['photo_image_url'] + "?q=75&fm=jpg&w=200&fit=max"
    images_url.append(download(url))

# display the images
print("Loading candidate images...")
for row in range(int(top_k / 5)):
    fig, axs = plt.subplots(1, 5, figsize=(20, 4))
    for i, img in enumerate(images_url[row * 5:row * 5 + 5]):
        axs[i % 5].imshow(img)
    plt.show()
Note:
The distance function finds the Euclidean distance between the query vector and all the relevant vectors.
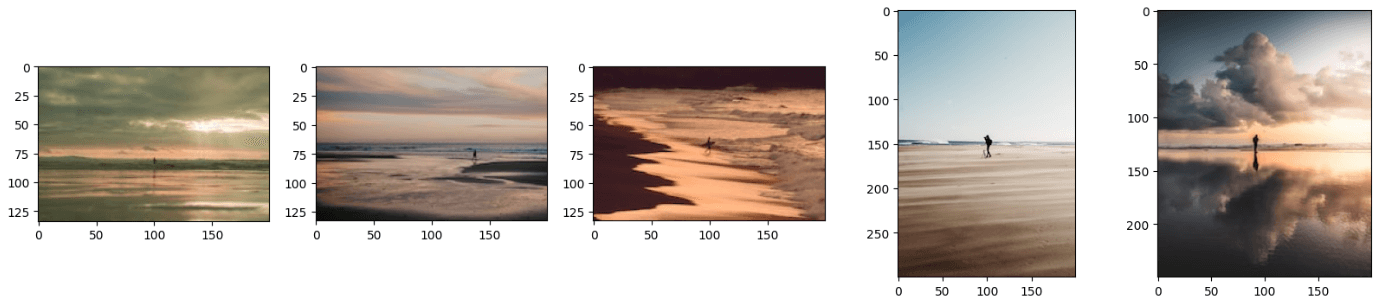
The above code will generate the results similar to this:
Note:
You can further improve the results using better techniques to merge the embeddings.
You may have noticed that the resultant images look like a combination of both text and the image. You can also get the results by providing just an image or text to this model and it'll work perfectly fine. For that, you simply need to comment on either the image_url or query_text line of code.
# Conclusion
Traditional models are used to get the vector representations of just a single data type, but the latest models are trained on much more data and they are now able to represent different types of data in just a unified vector space. We have used the abilities of the latest model, CLIP, to develop an application that takes both text and images as input and returns the relevant images.
The capabilities of multi-modal embeddings are not limited to image search applications, rather you can utilize this cutting-edge technique to develop state-of-the-art recommendation systems, Visual Question Answering applications where users can ask questions related to images, and many more. While developing these applications, consider using MyScale (opens new window), an integrated SQL vector database that enables you to store vector embeddings and tabular data from your dataset with super-fast data retrieval capabilities.
If you are building an image search app, welcome to exchange your ideas or feedback in MyScale Discord (opens new window).