Data is at the heart of nearly every organization today. As data volumes continue to explode, companies must find ways to effectively store, process, and analyze their data. This has led to an explosion in the database market, with companies utilizing both traditional SQL databases as well as newer vector databases to accomplish different tasks.
However, each type of database has tradeoffs. Traditional SQL databases offer consistency, accuracy, and ease of use for structured data, while vector databases are optimized for speed and scalability, especially with large volumes of unstructured data. But what if you don't have to choose? What if there was a database that gave you the best of both worlds?
In this blog, we are going to take a look at MyScale from very basics like creating tables and defining indexes to advanced SQL vector search. In the end, we will also compare MyScale with other databases in the market and see why MyScale is better. So, let's start.
# What is MyScale
MyScale (opens new window) is a cloud-based SQL vector database specially designed and optimized to manage large volumes of data for AI applications. It's built on top of ClickHouse (opens new window) (a SQL database), combining the capacity for vector similarity search with full SQL support. In a single interface, a SQL query can simultaneously and quickly leverage different data modalities to handle complex AI demands that would otherwise require more steps and time.
Different from specialized vector databases, MyScale harmoniously combines vector search algorithms with structured databases, enabling the management of both vectors and structured data within the same database. This integration yields benefits such as streamlined communication, adaptable metadata filtering, support for SQL and vector joint queries, and compatibility with mature tools commonly associated with versatile general-purpose databases. In essence, MyScale offers a unified solution, providing a holistic, efficient and easy-to-learn approach to address the complexities of AI data management.
# How to launch a cluster in MyScale
Before starting to use MyScale in your project, the first thing you need to do is to create an account and create a cluster that will store your data. Here we show you the steps:
- Sign in/Sign up for a MyScale account at myscale.com (opens new window)
- Once the account is created, click on the "+ New Cluster" button on the right side of the page
- Enter the name of the cluster and press the "Next" button
- Wait for the cluster to create, it'll take a few seconds
Once the cluster is created, you will see the text "Cluster Launched Successfully" on the pop-up button.
Note:
After the cluster is created, you also have the option to import ready-made sample data into your cluster, if you don't have your own data. However, in this tutorial, we will be loading our own data.
Now, the next step is to set up the working environment and access the running cluster. Let's do that.
# Setting up the environment
To use MyScale in your environment, you need to have:
- Python: MyScale provides a Python client library for interacting with the database, so you'll need Python installed on your system. If you don't have Python installed on your PC, you can download it from Python's official website (opens new window).
- MyScale Python Client: Install the ClickHouse client (opens new window) package using
pip:
pip install clickhouse-connect
Once the execution is completed, you can confirm the installation by entering the following command:
pip show clickhouse-connect
If the library is installed, you will see information about the package otherwise you'll see an error.
# Connection with the cluster
The next step is to connect the Python app with the cluster and for connection, we need the following details:
- Cluster host
- Username
- Password
To get the details, you can go back to your MyScale profile and hover over the three vertically aligned dots below the "Actions" text and click on the connection details.
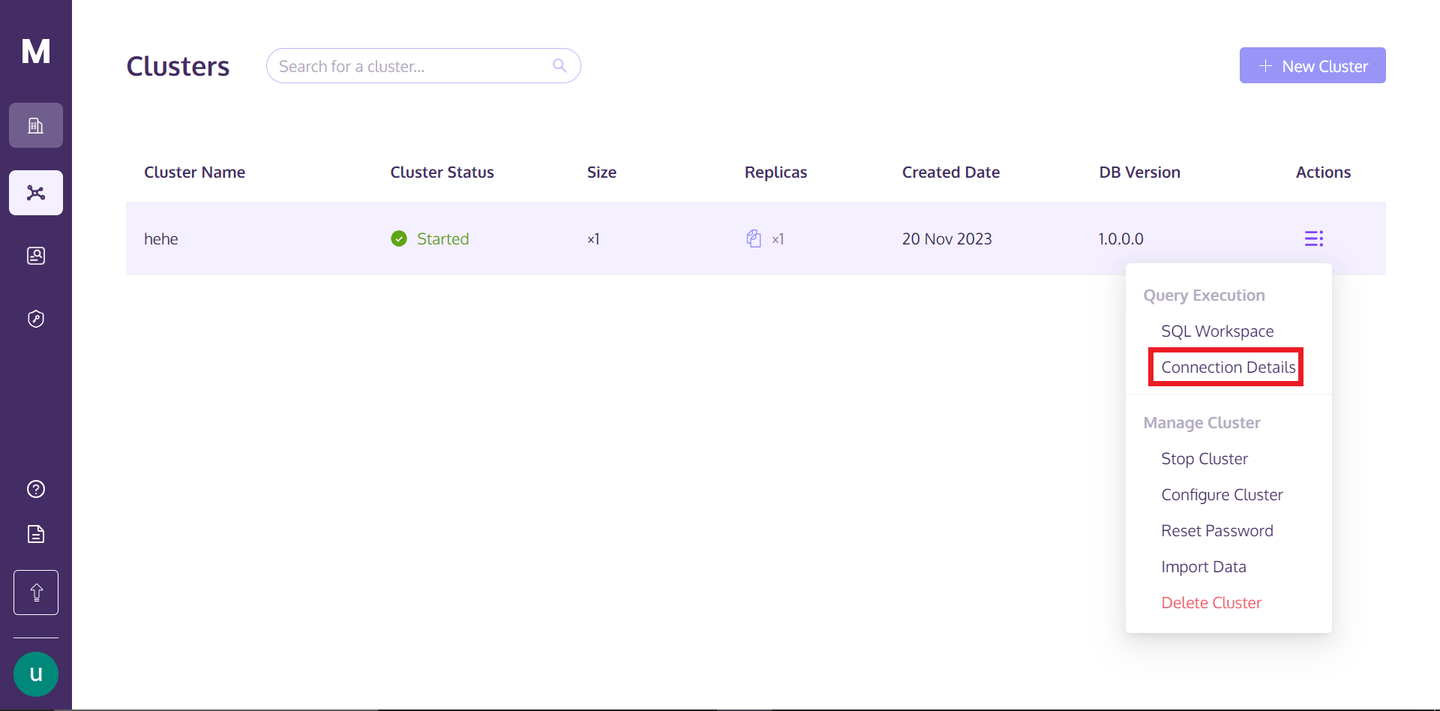
Once you click on the "Connection Details", you will see the following box:
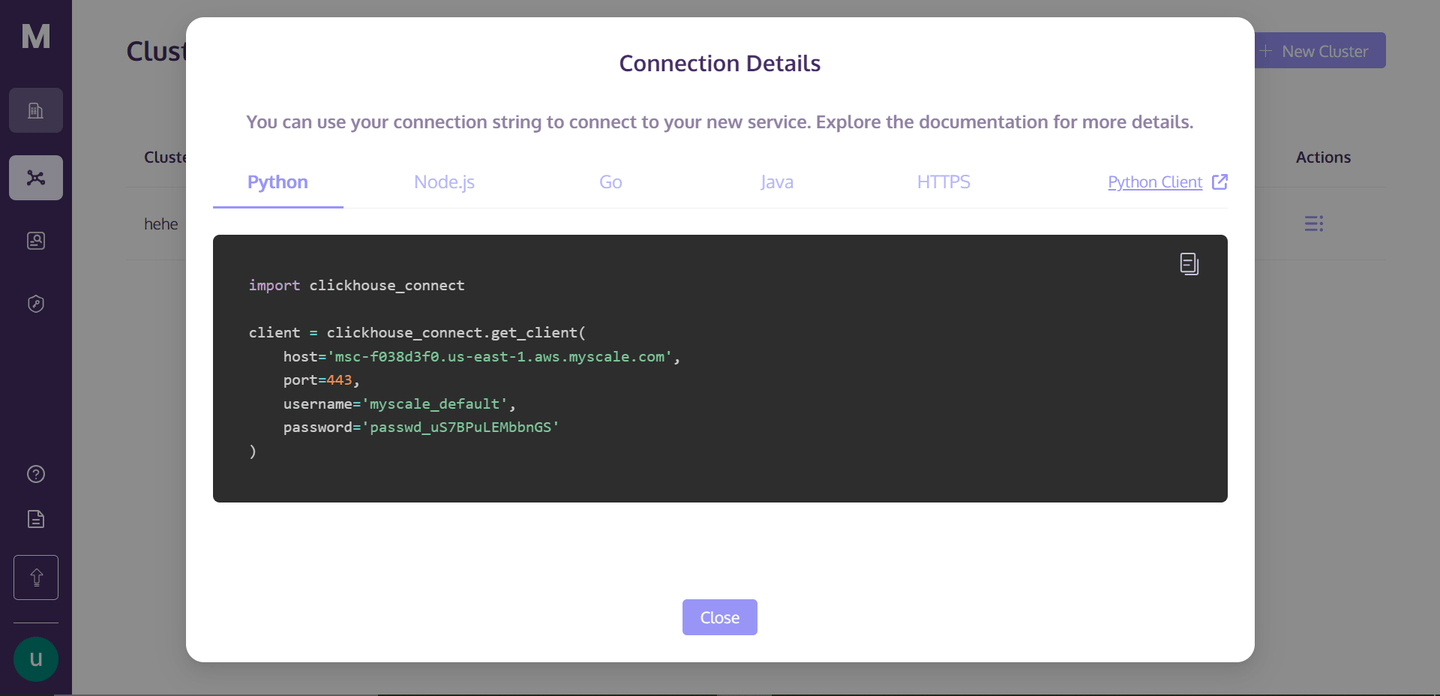
These are the connection details that you need to connect to the cluster. Just create a Python notebook file in your directory, copy-paste the following code into your notebook cell, and run the cell. It'll develop a connection with your cluster.
# Create a database
The next step is to create a database on the cluster. Let's see how you can do this:
client.command("""
    CREATE DATABASE IF NOT EXISTS getStart;
""")
This command first checks if the database with the same name exists, if not then, it will create a database with the name getStart.
# Create a table using MyScale
The basic syntax for creating a table in MyScale is as follows:
CREATE TABLE [IF NOT EXISTS] db_name.table_name
(
    column_name1 data_type [options],
    column_name2 data_type [options],
    ...
)
ENGINE = engine_type
[ORDER BY expression]
[PRIMARY KEY expression];
In the syntax above, you can replace the db_name and table_name according to your choice. Within the parentheses, you define the columns of your table. Each column (column_name1, column_name2, etc.) is defined with its respective data type (data_type), and you can optionally include additional column options ([options]), such as default values or constraints.
Note:
We are just taking a look at how tables are created in MyScale. We will create an actual table in the next step according to our data.
The ENGINE = engine_type clause is crucial in determining data storage and processing. you can specify the ORDER BY expression, which determines how data is physically stored in the table. The PRIMARY KEY expression is used to improve the efficiency of data retrieval. Unlike traditional SQL databases, the primary key in ClickHouse doesn't enforce uniqueness but is used as a performance optimization tool to accelerate query processing.
# Import data for a table and create an index
Let's get a hands-on experience by importing a dataset and then you'll learn to create a column against the dataset.
import pandas as pd
# URL of the data
url = 'https://d3lhz231q7ogjd.cloudfront.net/sample-datasets/quick-start/categorical-search.csv'
# Reading the data directly into a pandas DataFrame
data = pd.read_csv(url)
This should download the dataset from the provided URL and save it as a dataframe. The data should look like this:
| id    | data                                              | date       | label    |
|-------|---------------------------------------------------|------------|----------|
| 0     | [0,0,1,8,7,3,2,5,0,0,3,5,7,11,31,13,0,0,0,...     | 2030-09-26 | person   |
| 1     | [65,35,8,0,0,0,1,63,48,27,31,19,16,34,96,114,3... | 1996-06-22 | building |
| 2     | [0,0,0,0,0,0,0,4,1,15,0,0,0,0,49,27,0,0,0,...     | 1975-10-07 | animal   |
| 3     | [3,9,45,22,28,11,4,3,77,10,4,1,1,4,3,11,23,0,...  | 2024-08-11 | animal   |
| 4     | [6,4,3,7,80,122,62,19,2,0,0,0,32,60,10,19,4,0,... | 1970-01-31 | animal   |
| ...   | ...                                               | ...        | ...      |
| 99995 | [9,69,14,0,0,0,1,24,109,33,2,0,1,6,13,12,41,...   | 1990-06-24 | animal   |
| 99996 | [29,31,1,1,0,0,2,8,8,3,2,19,19,41,20,8,5,0,0,6... | 1987-04-11 | person   |
| 99997 | [0,1,116,99,2,0,0,0,0,2,97,117,6,0,5,2,101,86,... | 2012-12-15 | person   |
| 99998 | [0,20,120,67,76,12,0,0,8,63,120,55,12,0,0,0,...   | 1999-03-05 | building |
| 99999 | [48,124,18,0,0,1,6,13,14,70,78,3,0,0,9,15,49,4... | 1972-04-20 | building |
The next step is to create an actual table on the MyScale cluster and store this data. Let's do that.
client.command("""
    CREATE TABLE getStart.First_Table (
        id UInt32,
        data Array(Float32),
        date Date,
        label String,
        CONSTRAINT check_data_length CHECK length(data) = 128
    ) ENGINE = MergeTree()
    ORDER BY id
    """)
The above command will create a table named First_Table. The column names with data types are also given here. The reason for choosing the constraint is that we want the vectors of the data column to be exactly same, because in the later part we will apply vector search on this column.
# Insert data into the defined table
After the table creation process, the next step is to insert the data into the table. So, we will insert the data that we have downloaded earlier.
# Convert the data vectors to float, so that it can meet the defined datatype of the column
data['data'] = data['data'].apply(lambda x: [float(i) for i in ast.literal_eval(x)])

# Convert the 'date' column to the 'YYYY-MM-DD' string format
data['date'] = pd.to_datetime(data['date']).dt.date

# Define batch size and insert data in batches
batch_size = 1000  # Adjust based on your needs

num_batches = len(data) // batch_size

for i in range(num_batches):
    start_idx = i * batch_size
    end_idx = start_idx + batch_size
    batch_data = data[start_idx:end_idx]

    client.insert("getStart.First_Table", batch_data.to_records(index=False).tolist(), column_names=batch_data.columns.tolist())
    print(f"Batch {i+1}/{num_batches} inserted.")
The code above changes the data types of some columns according to the defined table. We are inserting data in the form of batches due to the large volume of data. So, we are creating batches of 1000.
# Create a vector index
So, the next step is to create a vector index. Let’s see how it’s done.
client.command("""
ALTER TABLE getStart.First_Table
    ADD VECTOR INDEX vector_index data
    TYPE MSTG
""")
Note:
The time for creating the vector index depends on the data in your table.
The MSTG vector index has been created by MyScale in-house and it has surpassed its competitors in terms of speed, accuracy and cost efficiency by a large margin.
To check if the vector index has been created successfully, we will try this command:
get_index_status="SELECT status FROM system.vector_indices WHERE table='First_Table'"
print(f"The status of the index is {client.command(get_index_status)}")
The output of the code must be "The status of the index is Built". The word "Built" means the index is up and created successfully.
Note:
Right now, MyScale only allows creating one index per table. But in the future, you’ll be able to create multiple indexes in a table.
# Write different types of SQL queries using MyScale
MyScale allows you to write different kinds of queries from the basics to the complicated ones. Let's start with a very basic query.
result=client.query("SELECT * FROM getStart.First_Table ORDER BY date DESC LIMIT 1")
for row in result.named_results():
    print(row["id"], row["date"], row["label"],row["data"])
You can also find the nearest neighbors of an entity using similarity scores from vectors. Let's take the extracted result and get its nearest neighbors:
results = client.query(f"""
    SELECT id, date, label,
    distance(data, {result.first_item["data"]}) as dist FROM getStart.First_Table ORDER BY dist LIMIT 10
""")
for row in results.named_results():
    print(row["id"], row["date"], row["label"])
Note:
The first_item method gives us the first element from the result array.
This should print the top 10 nearest neighbors of the given entry.
# Write natural language queries using MyScale
You can also query MyScale using natural language queries but for that, we will create another table with new data with features from neural networks.
Before creating the table, let's load the data. The original file can be downloaded here (opens new window).
with open('/`../../modules/state_of_the_union.txt`', 'r', encoding='utf-8') as f:
    texts = [line.strip() for line in f if line.strip()]
This command will load the text file and split it into separate documents. To transform these text documents into vector embeddings, we will use the OpenAI API. To install this, open your terminal and enter the following command:
pip install openai
Once the installation is completed you can setup your embeddings model and get the embeddings:
import os
# Import OPENAI
import openai
# Import pandas
import pandas as pd
# Set the environment variable for OPENAI API Key
os.environ["OPENAI_API_KEY"] = "your_api_key_here"

# Get the embedding vectors of the documents
response = openai.embeddings.create(
            input = texts,
            model = 'text-embedding-ada-002')

# The code below creates a dataframe. We will insert this dataframe directly to the table
embeddings_data = []
for i in range(len(response.data)):
    embeddings_data.append({'id': i, 'data': response.data[i].embedding, 'content': texts[i]})
# Convert to Pandas DataFrame
df_embeddings = pd.DataFrame(embeddings_data)
The code above will convert the text documents into embeddings and then create a dataframe that will be inserted into a table. Now, let's proceed to create the table.
client.command("""
               CREATE TABLE getStart.natural_language (
                    id UInt32,
                    content String,
                    data Array(Float32),
                    CONSTRAINT check_data_length CHECK length(data) = 1536
                ) ENGINE = MergeTree()
                ORDER BY id;
               """)
The next step is to insert the data into the table.
# Set the batch size to 20
batch_size = 20
# Find the number of batches
num_batches = len(df_embeddings) // batch_size

# Insert the data in the form of batches
for i in range(num_batches + 1):
    # Define the starting point for each batch
    start_idx = i * batch_size
    # Define the last index for each batch
    end_idx = min(start_idx + batch_size, len(df_embeddings))
    # Get the batch from the main DataFrame
    batch_data = df_embeddings[start_idx:end_idx]

    # Insert the data
    if not batch_data.empty:
        client.insert("getStart.natural_language",
                      batch_data.to_records(index=False).tolist(),
                      column_names=batch_data.columns.tolist())

        print(f"Batch {i+1}/{num_batches + 1} inserted.")
The data insertion process might take some time, depending on the size of the data, but you can monitor the progress like this. Now, let's move on to creating the index for our table.
client.command("""
ALTER TABLE getStart.natural_language
ADD VECTOR INDEX vector_index_new data
TYPE MSTG
""")
Once the index has been created, you are ready to begin making queries.
# Convert the query to vector embeddigs
response = openai.embeddings.create(
# Write your query in the input parameter
input = 'What did the president say about Ketanji Brown Jackson?',
model = 'text-embedding-ada-002'
)

# Get the results
results = client.query(f"""
    SELECT id,content,
    distance(data, {list(response.data[0].embedding)}) as dist FROM getStart.natural_language ORDER BY dist LIMIT 5
""")

for row in results.named_results():
    print(row["id"] ,row["content"], row["dist"])
It should print the following results:
| ID  | Text                                                                                                             | Score               |
| --- | ---------------------------------------------------------------------------------------------------------------- | ------------------- |
| 269 | And I did that 4 days ago, when I nominated Circuit Court of Appeals Judge Ketanji Brown Jackson...              | 0.33893799781799316 |
| 331 | The Cancer Moonshot that President Obama asked me to lead six years ago.                                         | 0.4131550192832947  |
| 80  | Vice President Harris and I ran for office with a new economic vision for America.                               | 0.4235861897468567  |
| 328 | This is personal to me and Jill, to Kamala, and to so many of you.                                               | 0.42732131481170654 |
| 0   | Madam Speaker, Madam Vice President, our First Lady and Second Gentleman. Members of Congress and the Cabinet... | 0.427462637424469   |
These are just a few examples of queries, you can write as many complex queries as you want according to your own needs and project.

# MyScale leads the way in SQL vector databases
MyScale stands out in the SQL vector database market with unmatched accuracy, performance and cost efficiency. It shines over other integrated vector databases like pgvector and specialized vector databases like Pinecone, achieving much better search accuracy and faster query processing at a lower cost. Beyond performance, The SQL interface is highly user-friendly for developers, offering maximum value with minimal learning necessary.
MyScale really steps up the game. It's not just about better search through vectors; it delivers high accuracy and query per second (QPS) in scenarios involving complex metadata filters. Plus, here’s the most important thing: if you sign up, you get to use the S1 pod for free, which can handle up to 5 million vectors. It's the go-to choice for anyone who needs a powerful yet cost-effective vector database solution.
# MyScale empowers applications with AI integrations
MyScale enhances its capabilities and allows you to create more robust applications through integration with AI technologies. Let's see a few of those integrations where you can improve your MyScale application.
Integration with LangChain: In today’s world, where the use cases of AI applications are increasing day by day, you can't create a robust AI application by just combining LLMs with databases. You will have to use different frameworks and tools to develop better applications. In this regard, MyScale provides complete integration with LangChain (opens new window), allowing you to create more effective and reliable AI applications with advanced retrieval strategy. Especially, the self-query retriever for MyScale (opens new window) implements a flexible and powerful method for converting text to metadata filtered vector queries, achieving high accuracy in many real-world scenarios.
Integration with OpenAI: By integrating MyScale with OpenAI, you can significantly enhance the accuracy and robustness of your AI application. OpenAI allows you to get the best embedding vectors, keeping the context and semantics. This is very important when you're applying vector search using natural language queries or extracting embeddings from your data. This is how you can improve the precision and accuracy of your applications. For a more detailed understanding, you can read our Integration with OpenAI (opens new window) docs.
Recently, OpenAI released GPTs, allowing developers to effortlessly customize GPTs and chatbots. MyScale adapts to this shift, transforming RAG system development by seamlessly injecting server-side contexts into GPT models. MyScale streamlines context injection with structured data filtering and semantic search through SQL WHERE clauses, optimizing knowledge base storage cost-effectively and enabling sharing across GPTs. Welcome to give MyScaleGPT (opens new window) a try on GPT Store or hook your knowledge base into GPTs with MyScale (opens new window).
# Conclusion
As AI and machine learning applications are growing, there is a surging need for databases like MyScale, designed specially for modern AI applications. MyScale is a cutting-edge SQL vector database that combines the speed and functionalities of traditional databases with state-of-the-art vector search capabilities. This mix is perfect for boosting AI applications.
Most importantly, due to MyScale's full compatibility with SQL syntax, every developer who is familiar with SQL can quickly get started with MyScale. Moreover, the costs on MyScale are significantly lower than other types of vector databases. (opens new window) These make MyScale a compelling choice for enterprises managing substantial data volumes, as it offers a distinct advantage in building production-grade GenAI applications with the familiarity and power of SQL. If you wish to stay updated on MyScale, welcome to join us today on Discord (opens new window) or Twitter (opens new window).