Retrieval-augmented generation (RAG) (opens new window) is often used to develop customized AI applications including chatbots (opens new window), recommendation systems (opens new window) and other personalized tools. This system uses the strengths of vector databases and large language models (LLMs) to provide high-quality results.
Selecting the right LLM for any RAG model is very important and requires considering factors like cost, privacy concerns and scalability. Commercial LLMs like OpenAI's GPT-4 (opens new window) and Google's Gemini (opens new window) are effective but can be expensive and raise data privacy concerns. Some users prefer open source LLMs (opens new window) for their flexibility and cost savings, but they require substantial resources for fine-tuning (opens new window) and deployment, including GPUs and specialized infrastructure. Additionally, managing model updates and scalability can be challenging with local setups.
A better solution is to select an open source LLM and deploy it on the cloud. This approach provides the necessary computational power and scalability without the high costs and complexities of local hosting. It not only saves on initial infrastructural costs but also minimizes maintenance concerns.
Let’s explore a similar approach to develop an application using cloud-hosted open source LLMs and a scalable vector database.
# Tools and Technologies
Several tools are required to develop this RAG-based AI application. These include:
- BentoML (opens new window): BentoML is an open source platform that simplifies deployment of machine learning models into production-ready APIs, ensuring scalability and ease of management.
- LangChain (opens new window): LangChain is a framework for building applications using LLMs. It offers modular components for easy integration and customization.
- MyScaleDB (opens new window): MyScaleDB is a high-performance, scalable database optimized for efficient data retrieval and storage, supporting advanced querying capabilities.
In this tutorial, we will extract data from Wikipedia using LangChain’s WikipediaLoader module and build an LLM on that data.
Note:
You can find the complete Python notebbook (opens new window) on MyScale examples repository.
# Preparation
# Set Up the Environment
Start setting your environment to use BentoML, MyScaleDB and LangChain in your system by opening your terminal and entering:
pip install bentoml langchain clickhouse-connect
This should install all three packages in your system. After this, you're ready to write code and develop the RAG application.
# Load the Data
Begin by importing the WikipediaLoader (opens new window) from the langchain_community.document_loaders.wikipedia module. You’ll use this loader to fetch documents related to "Albert Einstein" from Wikipedia (opens new window).
from langchain_community.document_loaders.wikipedia import WikipediaLoader
loader = WikipediaLoader(query="Albert Einstein")

# Load the documents
docs = loader.load()

# Display the content of the first document
print(docs[0].page_content)
This uses the load method to retrieve the “Albert Einstein” documents, and the print method to print the contents of the first document to verify the loaded data.
# Split the Text into Chunks
Import the CharacterTextSplitter (opens new window) from langchain_text_splitters, join the contents of all pages into a single string, then split the text into manageable chunks.
from langchain_text_splitters import CharacterTextSplitter
# Split the text into chunks
text = ' '.join([page.page_content.replace('\\t', ' ') for page in docs])
text_splitter = CharacterTextSplitter(
   separator="\\n",
   chunk_size=400,
   chunk_overlap=100,
   length_function=len,
   is_separator_regex=False,
)
texts = text_splitter.create_documents([text])
splits = [item.page_content for item in texts]
The CharacterTextSplitter is configured to split this text into chunks of 400 characters with an overlap of 100characters to ensure no information is lost between chunks. The page_contentor text is stored in the splits array, which contains only the text content. You will use the splits array to get the embeddings (opens new window).
# Deploy the Models on BentoML
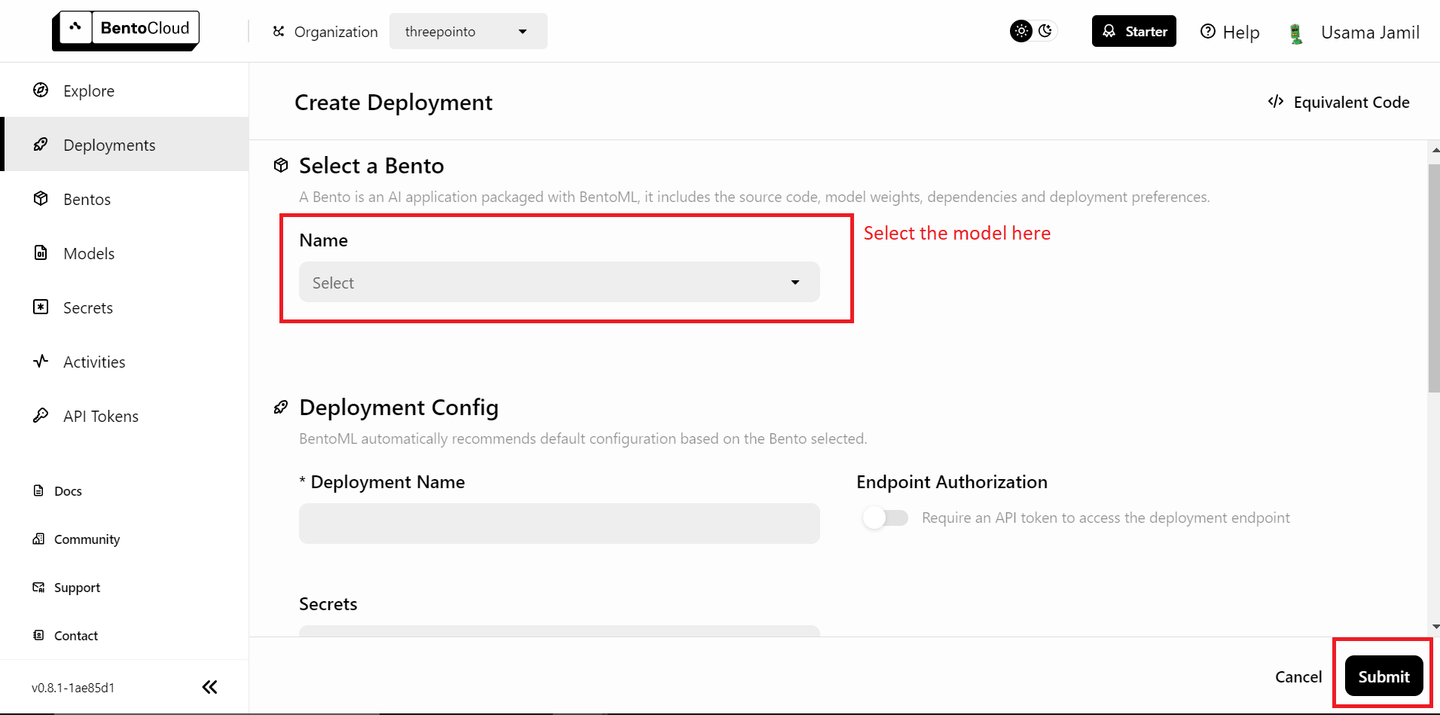
Your data is ready, and the next step is to deploy the models on BentoML and use them in your RAG (opens new window) application. Deploy the LLM first. You’ll need a free BentoML account, and you sign up for one on BentoCloud (opens new window) if needed. Next, navigate to the deployments section and click on the "Create Deployment" button in the top-right corner. A new page will open that looks like this:

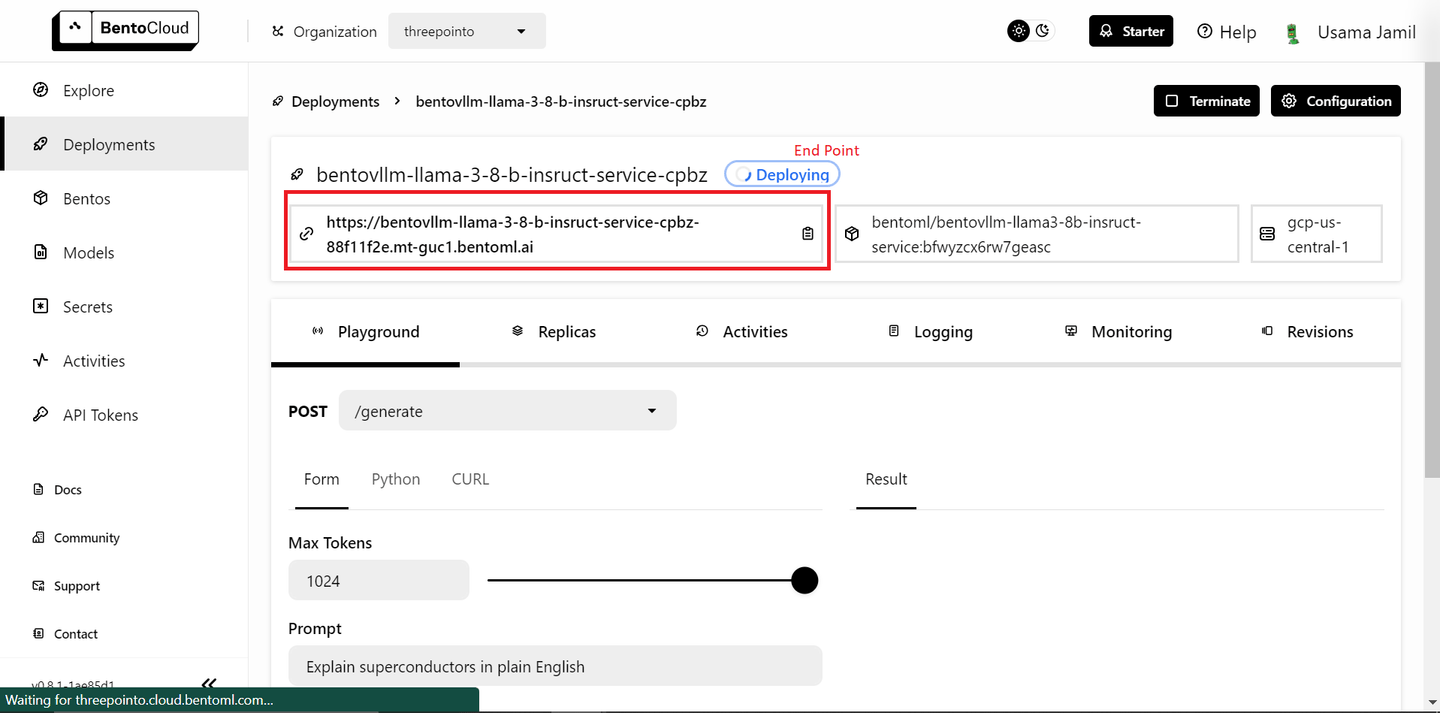
Select the "bentoml/bentovllm-llama3-8b-instruct-service (opens new window)" model from the drop-down and click "Submit" in the bottom right-corner. This should start deploying the model. A new page like this will open:

The deployment can take some time. Once it is deployed, copy the endpoint.
Note:
BentoML's free tier only allows the deployment of a single model. If you have a paid plan and can deploy more than one model, follow the steps below. If not, don't worry — we will use an open source model locally for embeddings.
Deploying the embedding model is very similar to the steps you took to deploy the LLM:
- Go to the Deployments page.
- Click the "Create Deployment" button.
- Select the
sentence-transformersmodel from the list and click "Submit." - Once the deployment is complete, copy the endpoint.
Next, go to the API Tokens page (opens new window) and generate a new API key. Now you are ready to use the deployed models in your RAG application.
# Define the Embeddings Method
You will define a function called get_embeddings to generate embeddings for the provided text. This function takes three arguments. If the BentoML endpoint and API token are provided, the function uses BentoML's embedding service; otherwise, it uses the local transformers and torch libraries to load the sentence-transformers/all-MiniLM-L6-v2model and generate embeddings.
# Import the libraries
import subprocess
import sys
import numpy as np

# Install the packages if the API key isn't provided
def install(package):
   subprocess.check_call([sys.executable, "-m", "pip", "install", package])

# Define the embedding method
def get_embeddings(texts: list, BENTO_EMBEDDING_MODEL_END_POINT=None, BENTO_API_TOKEN=None) -> list:
   # If the BentoML KEY is provided, the method will use BENTOML model to get embeddings
   if BENTO_EMBEDDING_MODEL_END_POINT and BENTO_API_TOKEN:
       import bentoml
       embedding_client = bentoml.SyncHTTPClient(BENTO_EMBEDDING_MODEL_END_POINT, token=BENTO_API_TOKEN)
       return embedding_client.encode(sentences=texts).tolist()

   # Otherwise it'll use transformers library
   else:
       # Install transformers and torch if not already installed
       try:
           import transformers
       except ImportError:
           install("transformers")
       try:
           import torch
       except ImportError:
           install("torch")

       from transformers import AutoTokenizer, AutoModel

       # Initialize the tokenizer and model for embeddings
       tokenizer = AutoTokenizer.from_pretrained("sentence-transformers/all-MiniLM-L6-v2")
       model = AutoModel.from_pretrained("sentence-transformers/all-MiniLM-L6-v2")

       inputs = tokenizer(texts, padding=True, truncation=True, return_tensors="pt", max_length=512)
       with torch.no_grad():
           outputs = model(**inputs)
       embeddings = outputs.last_hidden_state.mean(dim=1)
       return embeddings.numpy().tolist()
This setup allows flexibility for free-tier BentoML users, who can deploy only one model at a time. If you have a paid version of BentoML and can deploy two models, you can pass the BentoML endpoint and Bento API token to use the deployed embedding model.
# Get the Embeddings
Iterate over the text chunks (splits) in batches of 25 to generate embeddings using the get_embeddings function defined above.
all_embeddings = []
# Pass the splits in a batch of 25
for i in range(0, len(splits), 25):
   batch = splits[i:i+25]
   # Pass the batch to the get_embeddings method
   embeddings_batch = get_embeddings(batch)
   # Append the embeddings to the all_embeddings list holdng the embeddings of the whole dataset
   all_embeddings.extend(embeddings_batch)
This prevents overloading the embedding model with too much data at once, which can be particularly useful for managing memory and computational resources.
# Create a DataFrame
Now, create a pandas (opens new window) DataFrame to store the text chunks and their corresponding embeddings.
import pandas as pd
df = pd.DataFrame({
   'page_content': splits,
   'embeddings': all_embeddings
})
This structured format makes it easier to manipulate and store the data in MyScaleDB.
# Connect to MyScaleDB
The knowledge base is complete, and now it’s the time to save the data to the vector database. This demo uses MyScaleDB for vector storage. Start a MyScaleDB cluster in a cloud environment by following the quickstart guide (opens new window). Then you can establish a connection to the MyScaleDB database using the clickhouse_connect library.
import clickhouse_connect
client = clickhouse_connect.get_client(
   host='your-host-name',
   port=443,
   username='your-user-name',
   password='your-password'
)
The client object created here will be used to execute SQL commands and interact with the database.
# Create a Table and Insert Data
Create a table in MyScaleDB to store the text chunks and embeddings. The table schema includes an id, the page_content and the embeddings.
# Create the table named RAG
client.command("""
CREATE TABLE IF NOT EXISTS default.RAG (
   id Int64,
   page_content String,
   embeddings Array(Float32),
   CONSTRAINT check_data_length CHECK length(embeddings) = 384
) ENGINE = MergeTree()
   ORDER BY id
""")

# Insert data into the table
batch_size = 100
num_batches = (len(df) + batch_size - 1) // batch_size

for i in range(num_batches):
   batch_data = df[i * batch_size: (i + 1) * batch_size]
   client.insert('default.RAG', batch_data.values.tolist(), column_names=batch_data.columns.tolist())
   print(f"Batch {i+1}/{num_batches} inserted.")
This ensures the embeddings have a fixed length of 384. The data from the DataFrame is then inserted into the table in batches to manage large data efficiently.
# Create a Vector Index
The next step is to add a vector index to the embeddings column in the RAG table. The vector index allows for efficient similarity searches, which are essential for retrieval-augmented generation tasks.
client.command("""
ALTER TABLE default.RAG
   ADD VECTOR INDEX vector_index embeddings
   TYPE MSTG
""")
# Retrieve Relevant Vectors
Define a function to retrieve relevant documents based on a user query. The query embeddings are generated using the get_embeddings function, and an advanced SQL vector query is executed to find the closest matches in the database.
def get_relevant_docs(user_query, top_k):
   query_embeddings = get_embeddings(user_query)[0]
   results = client.query(f"""
       SELECT page_content,
       distance(embeddings, {query_embeddings}) as dist FROM default.RAG ORDER BY dist LIMIT {top_k}
   """)
   relevant_docs = " "

   for row in results.named_results():
       relevant_docs=relevant_docs + row["page_content"]

   return relevant_docs

# Example query
message="Who is albert einstein?"
relevant_docs = get_relevant_docs(message, 8)
print(relevant_docs)
The results are ordered by distance, and the top k matches are returned. This setup finds the most relevant documents for a given query.
Note:
The distance method takes an embedding column and the embedding vector of the user query to find similar documents by applying cosine similarity.
# Connect to BentoML LLM
Establish a connection to your hosted LLM on BentoML. The llm_client object will be used to interact with the LLM for generating responses based on the retrieved documents.
import bentoml
BENTO_LLM_END_POINT = "add-your-end-point-here"

llm_client = bentoml.SyncHTTPClient(BENTO_LLM_END_POINT, token="your-token-here")
Replace the BENTO_LLM_END_POINT and token with the values you copied earlier during the LLM deployment
# Perform RAG
Define a function to perform RAG. The function takes a user question and the retrieved context as input. It constructs a prompt for the LLM, instructing it to answer the question based on the provided context. The response from the LLM is then returned as the answer.
def dorag(question: str, context: str):
   # Define the prompt template
   prompt = (f"You are a helpful assistant. The user has a question. Answer the user question based only on the context: {context}. \\n"
             f"The user question is {question}")
   # Call the LLM endpoint with the prompt defined above
   results = llm_client.generate(
       max_tokens=1024,
       prompt=prompt,
   )
   res = ""
   for result in results:
       res += result
   return res
# Make a Query
Finally, you can test it out by making a query to the RAG application. Ask the question "Who is Albert Einstein?" and use the doragfunction to get the answer based on the relevant documents retrieved earlier.
query = "Who is albert einstein?"
dorag(question=query, context=relevant_docs)
The output provides a detailed response to the question, demonstrating the effectiveness of the RAG setup.

If you ask the RAG model about Albert Einstein’s death, the response should look like this:

# Conclusion
BentoML stands out as an excellent platform for deploying machine learning models, including LLMs, without the hassle of managing resources. With BentoML, you can quickly deploy and scale your AI applications on the cloud, ensuring they are production-ready and highly accessible. Its simplicity and flexibility make it an ideal choice for developers, enabling them to focus more on innovation and less on deployment complexities.
On the other hand, MyScaleDB is explicitly developed for RAG applications, offering a high-performance SQL vector database. Its familiar SQL syntax makes it easy for developers to integrate and use MyScaleDB in their applications, as the learning curve is minimal. MyScaleDB’s Multi-Scale Tree Graph (MSTG) (opens new window) algorithm significantly outperforms other vector databases in terms of speed and accuracy. Additionally, for new users, MyScaleDB includes access to 5 million 768D vectors of storage, making it a desirable option for developers looking to implement efficient and scalable AI solutions.
What do you think about this project? Share your thoughts on Twitter (opens new window) and Discord (opens new window).
This article is originally published on The New Stack. (opens new window)


